In addition, I've tried to give some idea of the relative significance of each part as I cover it, and, in very general terms, of the probable cost of repairing it, if necessary. As such, I've used the terms "cheap" and "inexpensive" to refer to repairs that are likely to cost less than $100, "moderate" to mean $100 to $500, and "expensive," over $500. This value system is more likely to apply to inexpensive uprights than to other pianos, but you can make the translation as needed.
Much of the information you need can be found in previous chapters. Basic descriptions of piano parts and how they work are in Chapter 1, which you may want to review now. Page references are given to sections of Chapter 3, "Buying A New Piano," and other chapters that contain more helpful technical material. The information on how pianos differ in quality and features, also in Chapter 3, applies to used pianos too, especially those made since about 1960.
The tools you should bring with you are: a flashlight; a soft brush, such as a paint brush, for brushing away dust; a small screwdriver (with about a ⅛-inch tip) and a large screwdriver(with about a 5/16-inch tip), for removing outer case parts, if needed; a tuning fork or pitch pipe, obtainable from a music store, to determine if the piano is up to standard pitch; paper and pencil for taking notes; this book; and someone to play the piano, if you don't, and to lend moral support.
Looks, styling, and finish. Look the piano over. Imagine it in your home. Could you live with it? If not, you might as well not go any further. A grand can be partially restyled by changing the legs and music desk, and any piano can be refinished, but both of these are expensive (refinishing a grand piano can easily cost more than three thousand dollars.)
If you're thinking of refinishing the piano yourself, let me warn you: stripping and refinishing a piano is much more work than refinishing other furniture, and most do-it-yourselfers give up long before this job is done. Some take short cuts, and end up sealing the piano shut or painting the strings. But if you're prepared for the long haul, hire a technician first to remove all the outer case parts and the action and to cover the strings; then get a good book on furniture refinishing.
Also check for loose veneer and other signs of water damage along the bottom edge of verticals. In general, loose veneer is found on pianos that have undergone extremes of both dryness and dampness. If you're going to refinish the piano, of course, the veneer will first have to be reglued; otherwise, it's up to you.
Beware of old uprights that have been restyled in nonstandard ways, such as by cutting down the height of the upper panel, installing mirrors, and so on. Sometimes this work is done by people who haven't thought of the consequences and who turn out pianos that are henceforth difficult or impossible to service. If the work has been done by an experienced piano technician, though, it's probably all right.
___________________________
Opening the Piano for Inspection
Removing the cabinet parts of a piano is seldom difficult and will usually follow the directions outlined below. However, sometimes you will have to play detective to find an elusive screw or latch. If you understand the general principles involved in these instructions, you will probably be able to handle the exceptions.
When removing screws, be sure to identify them and return them to the same holes from which they were taken. Even screws that look alike can sometimes make slightly different holes in the wood. One method piano technicians sometimes use to keep screws organized is to punch them through a piece of cardboard and write on the cardboard the name of the cabinet part from which they were taken and their position.
Take special care not to scratch or otherwise damage the cabinet parts, especially if the piano doesn't belong to you. These parts can sometimes be unwieldy to handle, so I suggest that these procedures always be followed by two persons working together.
Grand
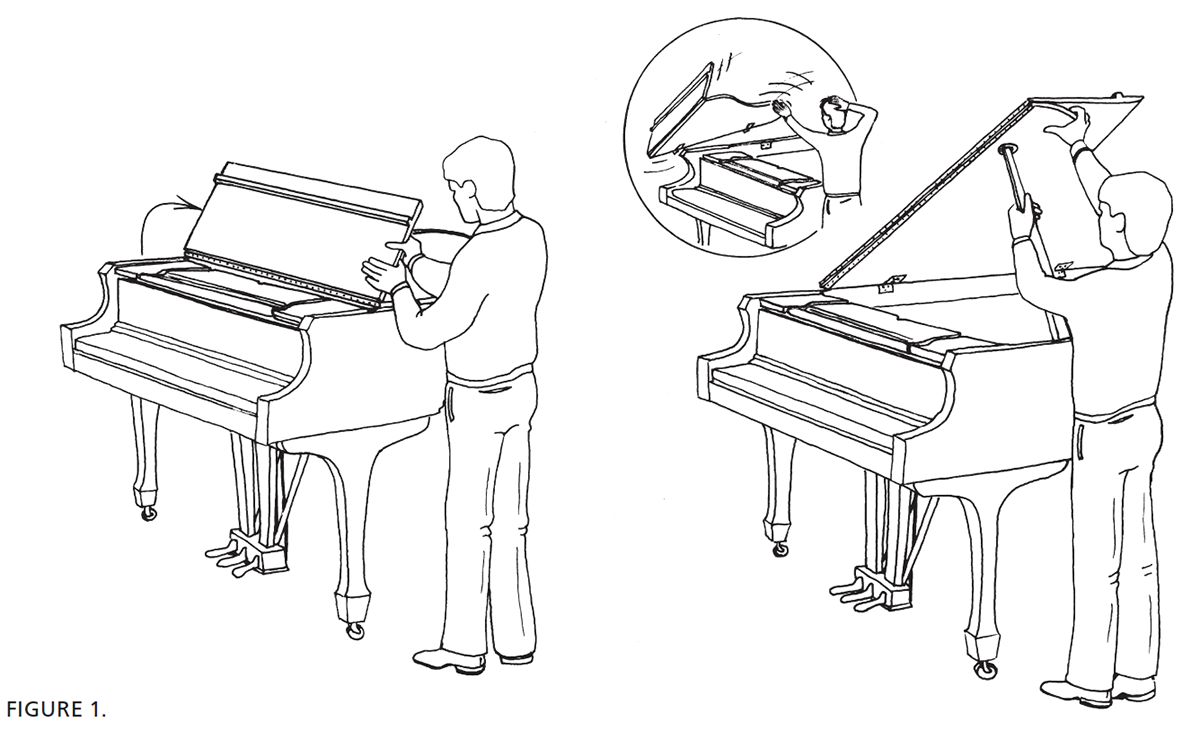
Open and prop up the lid (Figure 1). Fold the front part of the lid back onto the main lid. Then prop the lid open with the longer of the two propsticks. Caution: Before opening the lid, be sure the lid hinges are attached and the hinge pins are in place or your lid may fly away like the one shown in the inset.
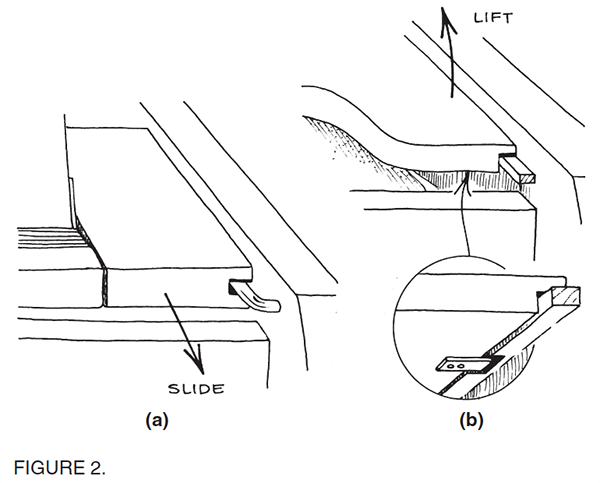
Remove the music desk (Figure 2). Try sliding the music desk out as shown in 2a. If it won't slide all the way out, then it's possible that a tab on the bottom of the desk must be lined up with a space in the sliderail, after which the desk can be lifted out, as in 5-6b. Some music desks are held in place by screws or hinge pins instead.
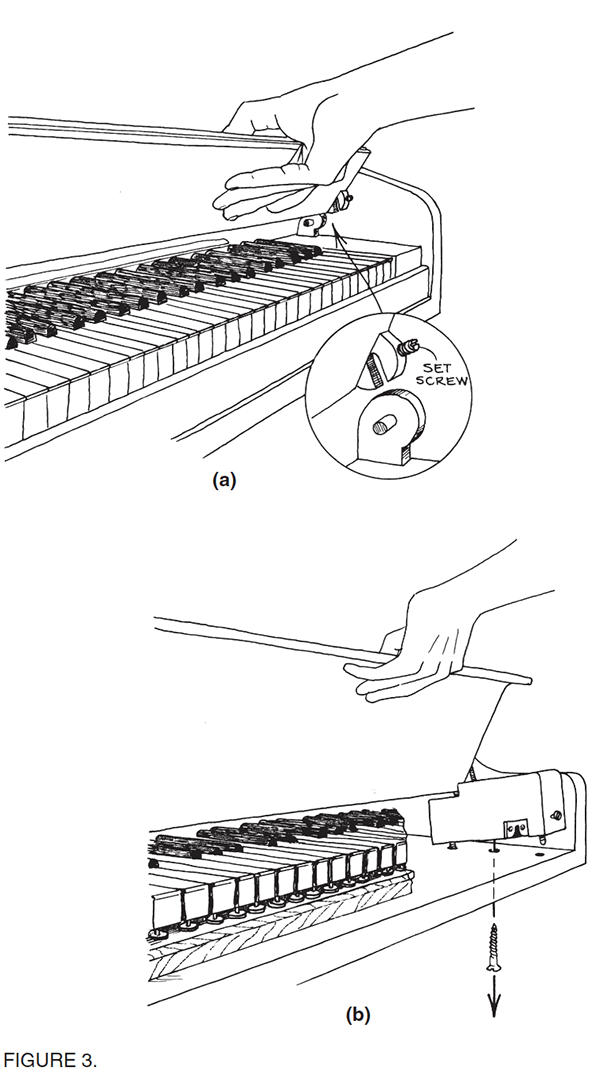
Remove the fallboard (Figure 3). (Note: Removing the fallboard from a grand piano can be tricky, and has the highest potential for scratching the case of all the operations described in this section. What you can see with the fallboard removed is helpful, but not essential, to your inspection of the piano.) There are two kinds of fallboard: One kind can be removed by itself, as shown in 3a. The other kind is attached to the keyblocks in such a way that the fallboard and keyblocks must be removed together as a unit, as in 3b.
Tilt the fallboard toward you at about a 45-degree angle, and, with both hands, try lifting the fallboard up and out of the piano. If there are set screws at the pivot points of the fallboard, as shown in the inset of (a), unscrew them several turns, then try lifting the fallboard up and out. If this doesn't work, try unscrewing the set screws another turn or two, but don't remove them entirely. Some fallboard pivot systems are very visible, as in (a); some are more hidden or of a slightly different design.
If there are no set screws, and the fallboard cannot be removed by just lifting, then it is probably type (b). You will need to skip ahead to "Remove the keyslip (Figure 4)" to complete that operation; then return here.
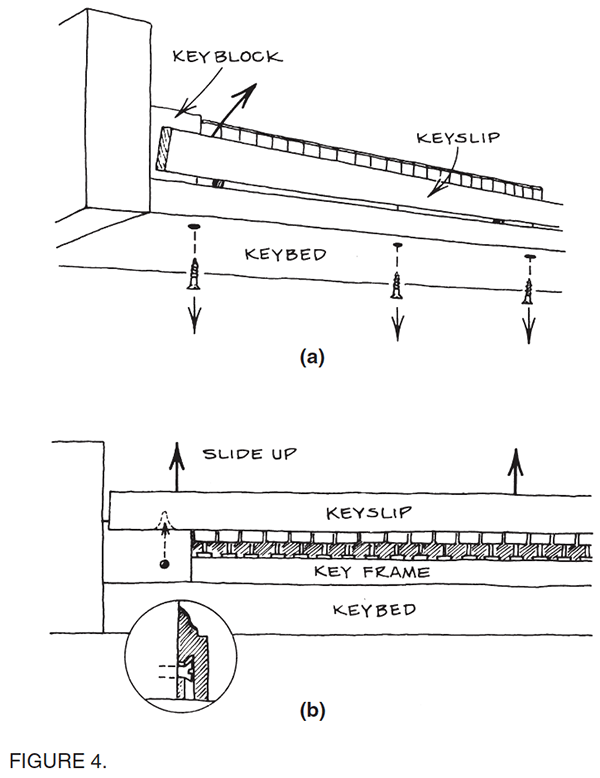
Look at the underside of the keybed, directly under the center of each keyblock, for a large screw that holds the keyblock down. Remove the two screws (one for each keyblock). Then lift up on the front of each keyblock to disengage its dowels (if any) from their holes in the keybed. Tilt the fallboard toward you and lift up on the whole fallboard-keyblock system. If it feels entirely loose and ready to be lifted out, do it. If not, check to see what's holding it in place (usually the dowels on the bottom of the keyblocks will still be stuck in their holes in the keybed). Lift the system out and place it on the floor. (Note that the keyblocks may not be fastened to the type (b) fallboard and may fall off once clear of the case, possibly landing on the floor or scratching the case. Be prepared to catch them or remove them before they fall.)
To return the fallboard to the piano when the inspection is finished: If the fallboard is type (a), be sure to notice how the pin in the case side (or in a metal bracket attached to the keyblock) lines up with the slot in the fallboard (or vice versa, depending on the particular piano). Sometimes this is tricky to do. Tighten the set screws, if any. If the fallboard is type (b), when you removed it from the piano and set it down on the floor it's possible that the keyblocks fell off. Not to worry. Set the fallboard in place on the keyboard, then, one at a time, reattach each keyblock to the metal stub at the end of the fallboard. Push each keyblock down so its dowels are firmly seated in their holes in the keybed. Then screw the keyblocks down with their large screws. Replace the keyslip (see Figure 4).
Remove the keyslip (Figure 4). (For the purpose of this inspection, you need only remove the keyslip if you are removing a type (b) fallboard, as previously described.) Most keyslips are removed as in 4a, by taking out three to six screws located under the keybed. On Steinway and Mason & Hamlin grands (and occasionally others), the keyslip is held in place by the heads of two screws, one projecting from the front of each keyblock, that fit into slots in the back of the keyslip (4b). Slide the keyslip up to disengage it; sometimes the fit is tight. When removing a keyslip, be sure to save any cardboard shims you find between the keyslip and the key frame and return them to the same position later.
Vertical
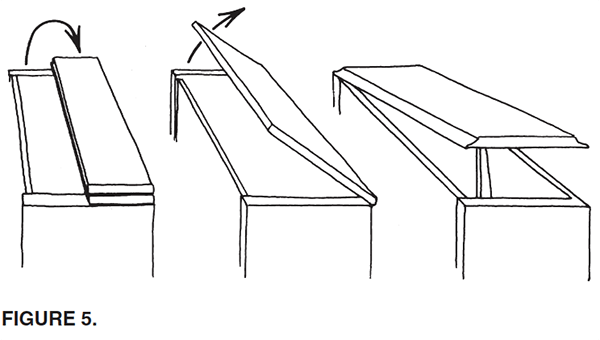
Open the lid (Figure 5). Most lids open one of the three ways shown in the drawing. The example on the right is a "grand style" lid, hinged on the left side, found on some contemporary verticals. To inspect the piano, remove the hinge pins on the grand style lid and take the lid off. (Note: Some studio pianos, such as the Baldwin Hamilton, open differently; see Figure 8.)
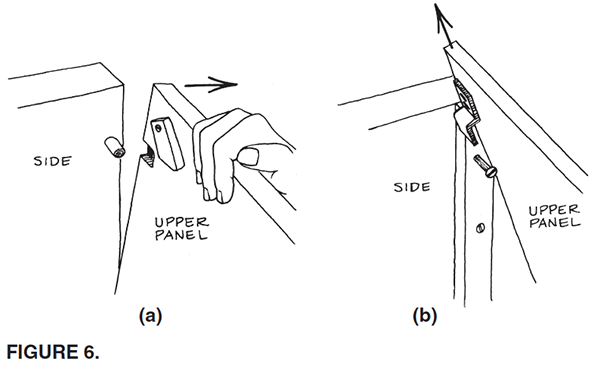
Remove the upper panel (Figure 6). If the piano is an upright, first close the fallboard down over the keys. This is done because on some uprights the fallboard mechanically interlocks with the upper panel, or leans against the upper panel, and makes disassembly difficult when open. The upper panel either is secured by a latch on each end, a common type of which is shown in 6a, or swings on screws or stout pins sticking out from the cabinet sides, as in 6b. Sometimes these methods may be combined, in which case you should proceed as for the first type. On some spinets and consoles, the upper panel-music shelf assembly is attached to the cabinet sides with screws. After removing the upper panel, try opening the fallboard. On some pianos the fallboard, when open, hits the action when the upper panel is not in place. Usually this kind of fallboard assembly can be removed by simply lifting it straight up and out of the piano. Otherwise, it's generally not necessary to remove the fallboard to inspect the vertical piano.
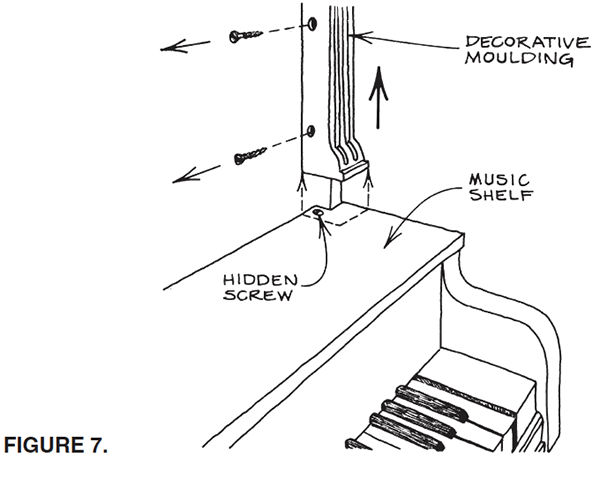
Remove the music shelf (Figure 7). Some old uprights have a separate music shelf, which must be removed. Sometimes the music shelf just slides out, or slides and then lifts, and sometimes it is held in by screws. The screws may be hidden under decorative moldings that must first be removed by unscrewing them from the cabinet sides.
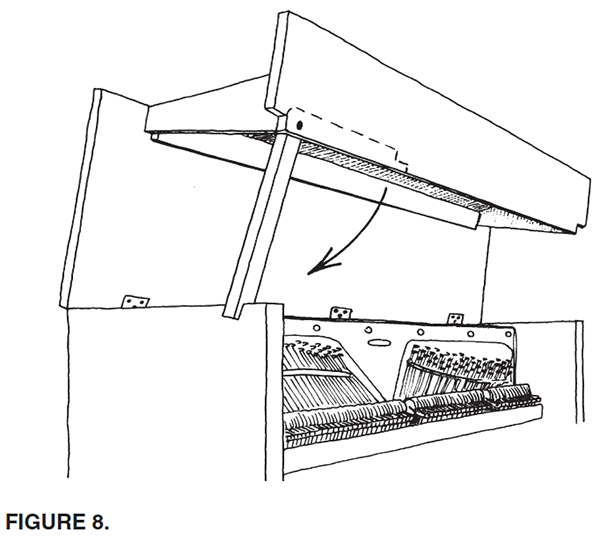
How to open some studio pianos (Figure 8). On some studio pianos, especially the Baldwin Hamilton, the lid, upper panel, and music shelf are all contained in one bulky piece. A propstick swings down to support this assembly on the cabinet side.
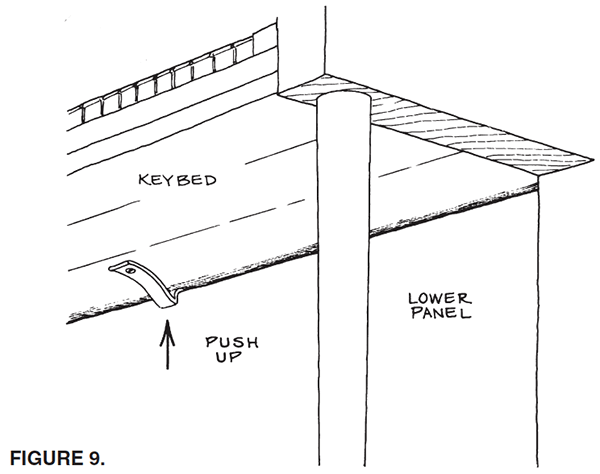
Remove the lower panel (Figure 9). The lower panel is usually held in place by a leaf spring or two. Simply press the spring(s) up toward the keybed and pull the panel out. Sometimes a rotating wooden latch is used instead. When replacing the lower panel, be sure the bottom edge of the panel is lined up correctly with the bottom rail on which it sits.
Finally, check for missing or broken cabinet parts and hardware, especially the music desk and its hinges, and to see if there is a matching bench in good condition or if you will have to buy one.
___________________________
Play the piano a bit to get some sense of what this instrument is all about and to relax a little before the next step. Make mental or written notes about anything you think needs looking into.
Open up the piano. First ask the owners to remove anything (other than music) that's on the piano. Let them break their knickknacks, not you. If they look askance as you start to take their piano apart, remind them that they wouldn't buy a used car without first looking under the hood, would they? Following Figures 1 through 9, for a grand, very carefully open the lid (after checking to make sure that the hinges and hinge pins are in place) and prop it up, and remove the music desk. You might also want to remove the fallboard, which may require removing the keyslip and keyblocks too. On a vertical, open the lid; remove the upper panel, music shelf, and music desk (depending on the style); and remove the bottom door. (Note: Removal of these parts is usually not difficult and is mandatory if you expect to do any reasonable inspection of a piano, so don't be shy.) No need to remove other parts at this time.
Pitch and tuning. Does the piano sound more or less in tune? When was it last tuned? If the piano is so far out of tune that some individual notes sound like chords — that is, the two or three strings of a single note (p. 7) are at radically different pitches from each other — then nine times out of ten that spells trouble. Even pianos left untuned for many years rarely go out of tune in that manner unless the tuning pins are loose (more about this shortly).
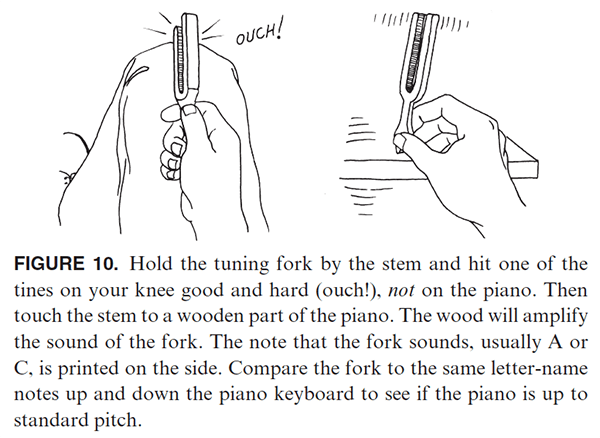
Now take out your pitch pipe or tuning fork (Figure 10). Tuning forks usually sound A or C; pitch pipes usually have a choice of notes to sound. Whatever note you choose, play the same note on the piano and see if they match. Play the same letter-name note at different octave intervals up and down the piano to see if they all sound pretty much in tune with each other and with the fork or pipe. If they are mostly within about a quarter step of being on pitch, fine. If a substantial portion of the piano is a semitone or more flat, this may or may not mean trouble — we don't know yet — but it will mean extra tuning work to bring it up to pitch — if it can be brought up to pitch. Make an ominous note in your notebook.
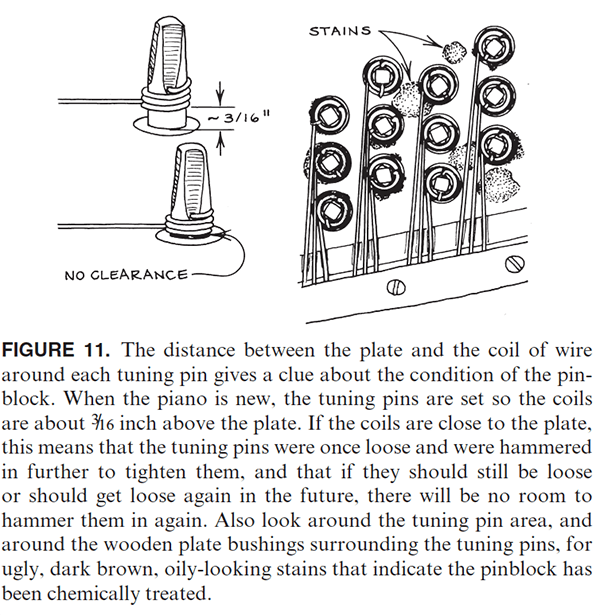
The pinblock. The condition of this crucial part of the piano's structure determines whether or not the piano will stay in tune. Unfortunately, it's the part of the piano you can tell the least about yourself, as the experience and tools of a professional are needed to determine if the tuning pins are tight enough to hold the strings at their proper tension. Nevertheless, you can read a few clues. Look at the tuning pins. Do they look uniform in appearance, or do some appear to have been replaced? When tuning pins get loose, they are often replaced with ones slightly larger in diameter, so some new pins may suggest an aging or defective pinblock. Now look at the coils around the tuning pins (Figure 11). When the piano is new, the pins are set so the coil of wire around each pin is about 3/16 inch above the plate. If pins get loose, they can be driven further in to tighten them — if necessary, until the coils are almost touching the plate. That 3/16 inch acts as a safety margin: even if the tuning pins on the piano you are inspecting turn out to be loose, the piano may still be worth buying if there is still sufficient space left between the coils and the plate to drive the pins in further to tighten them. (However, this repair doesn't always work, and repinning the piano with larger tuning pins is preferred when economically feasible.) Conversely, if the piano is dreadfully out of tune and far below standard pitch and the tuning pins have already been driven in as far as they can go, the chances are fairly good that that piano would require extensive rebuilding to bring it back to life. A new set of larger tuning pins could cost at least several hundred dollars, and a new pinblock, if necessary, could cost a few thousand by the time all the work necessitated by it was completed. These are just clues; a final judgment on the matter must await the technician.
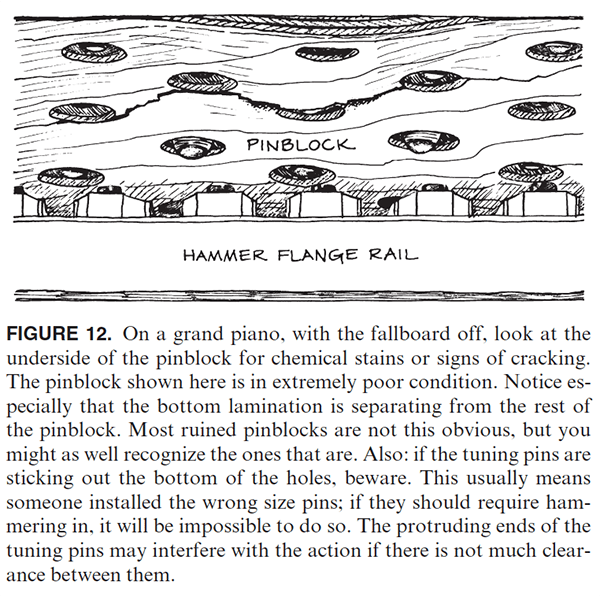
Also look around the tuning pins and on nearby areas of the plate for ugly, dark brown, gummy-looking stains that indicate the pinblock has been doped with chemicals to tighten the pins. On a grand, also look on the underside of the pinblock for the stains and for signs of cracking (Figure 12). Don't confuse dirt and rust with the chemical stains. Unless the piano is otherwise in very good condition, the price is right, or you plan to replace the pinblock anyway (a major rebuilding job), you would probably do best to steer away from a piano that has been doped.
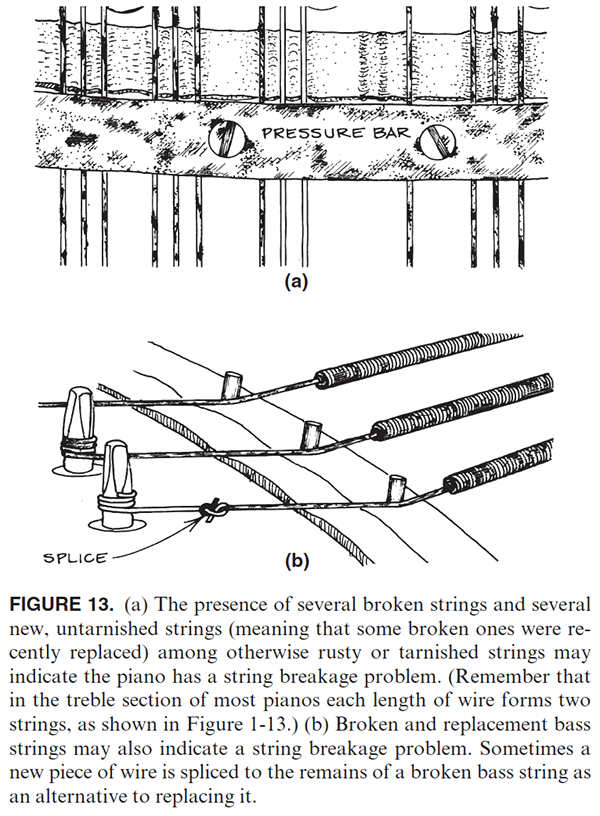
Strings. How rusty are the strings? Some tarnish or a very light coating of rust is normal for an old piano. What you want to avoid is heavy, encrusted rust on the strings and pressure bar that will make the tone bad and cause the strings to break during tuning (although strings sometimes break even if they aren't rusty). Has this piano had a string breakage problem? Look carefully at the strings, which are arranged in sets of one, two, or three called unisons (p. 7), to see if any are missing (Figure 13a). Are there many new-looking, untarnished strings on the piano? Some new strings — how nice, right? Wrong. Those new strings were installed to replace ones that broke, so their presence amidst the rusty ones indicates a possible string breakage problem, especially if several strings are missing too. Occasional string replacement (an inexpensive item) can be tolerated, but the expense and nuisance add up if strings break often. The presence of spliced bass strings, an alternative to replacement of broken bass strings, can also indicate a possible string breakage problem (Figure 13b).
Now play some bass notes. Do they "resound"? Or do they sound like they're underwater or being struck through a heavy blanket (thud . . . thud)? The copper or iron windings (p. 33, 38) on these strings loosen with time and also become clogged with dirt, which diminishes their flexibility. Replacing an entire set of bass strings, a moderate expense, is generally worth doing if the piano is otherwise in reasonable condition. Twisting and cleaning the old bass strings to make them sound better costs about half as much, but doesn't always work satisfactorily, and can make marginally tight tuning pins too loose to hold the strings in tune. If the bass strings need replacing and the piano is one of some value, you should consider restringing the entire piano at one time.
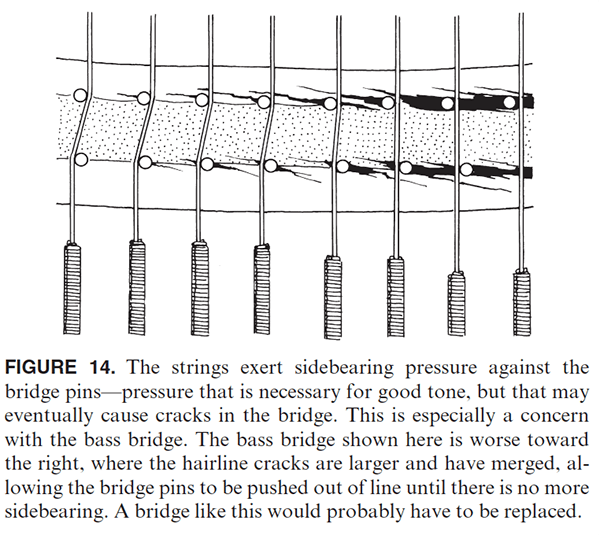
The bridges. The treble and bass bridges transfer the vibration of the strings to the soundboard. Of special interest to us here is the bass bridge, which has a strong tendency to form cracks around the bridge pins due to the side pressure of the strings against them. Follow the bass strings toward their far end (on a vertical, to their bottom end) to find the bass bridge. As you look for cracks around the bridge pins you may need your flashlight to chase away the shadows and your brush to chase away the dust. Now, you may see some tiny hairline cracks around some — maybe even all — the bridge pins. This is very common and usually not a problem. The problem begins when the cracks get big enough so the bridge pins are actually pushed aside. This can cause a severe deterioration or loss of tone in the affected notes. Then the problem worsens when the cracks around adjacent pins run together, resulting in a perforated bridge ready to fall apart (Figure 14). If the pitch of the piano must be raised much to get it up to standard pitch, the resulting increase in string tension may exacerbate this condition.
A loose bass bridge will also cause a loss of tone. If one end of the bass has a much weaker tone than the other end, you might try pushing that end of the bridge down toward the soundboard while someone else plays the keys. If the tone noticeably improves, then the bridge is coming loose from the soundboard.
The treble bridge can also develop cracks, usually in the highest octave. On a vertical piano these can be hard to see because the action is in the way. Try peering down behind the action with your flashlight. If the bridge appears to be badly cracked, check the tone of these notes by plucking individual strings with your fingers. Do they give off a tone of a definite pitch, or is the pitch indistinct? The treble bridge on a grand piano can easily be viewed throughout.
Bridge repairs, unless very minor, tend to be moderately to very expensive, and are usually unjustified for the cheaper pianos, although it is not uncommon for a good upright to be fitted with a new bass bridge cap (p. 39). If the damage is not too severe, sometimes a less expensive repair can be made to a cracked bridge by removing bridge pins, filling cracks with epoxy, and then reinstalling the pins. A loose bass bridge can often be reattached by stuffing glue under the loose part and securing with a screw from the back of the soundboard.
One more bridge-related concern should be mentioned. On some pianos, both verticals and grands, made in the early part of this century (or earlier), the upper bearing point (the end of the vibrating portion of the string that is closer to the tuning pins) for the bass strings is made of wood instead of being an integral part of the cast-iron plate. This wooden "upper bridge" tends to have the same cracking problems that the lower bridge does, sometimes worse. Be especially cautious about buying a piano with serious cracks in this area.
Structural integrity. This refers to the condition of the cast-iron plate and the supporting wooden case, posts, and beams (p. 28). Once in a great while, a crack will develop in one of these parts, most often the plate, usually rendering the piano useless (and usually unrepairable). In a grand, the plate can be seen in its entirety from above, and the rest of the supporting structure from below. In a vertical, much of the plate is hidden from view; the wooden structure, though, can easily be examined by moving the piano away from the wall and looking at the back. (Note: When pulling a vertical piano away from the wall, watch for wooden blocks under the back if the casters are missing.) In a vertical, look especially at the back of the top horizontal beam, and, if exposed, the top of the piano back (under the lid), for anything other than minor surface cracking. Also make sure the case sides are not coming unglued from the vertical back structure. In a grand, check the bottom edge of the rim for delamination. To be honest, I'm including these items only for the sake of completeness; your chance of finding a major structural problem of this sort is probably very tiny. (An important exception is when a piano has been moved from a humid climate to a very dry one. In this situation it is more common to find wooden structural parts coming unglued.) An indication that a structural problem should be looked for might be, for example, that a piano only recently tuned has gone quickly and drastically out of tune for no apparent reason (although there are certainly lots of other reasons why this could happen). Major structural problems, especially a cracked plate, are very risky to try to repair. The risk should be left to a rebuilder, not you.
Another, more likely, structural problem — this one unrelated to tuning — is the condition of the legs. The front legs of spinets and consoles very frequently crack or become loose.Usually they can be repaired or replaced at not too great a cost. Check also for visible (or invisible) cracks in the legs of grands. Push on the piano gently both forward and sideways to see if it rocks unduly. Installing a new set of grand legs or leg plates (which hold the legs on) is a bit costly, but usually worth doing if the piano is otherwise worth buying. Last, check for cracks in the lid of a grand, or loose lid hinges. A cracked lid could necessitate an expensive lid replacement, but only for aesthetic reasons. Damaged lid hinges should be repaired or replaced for safety.
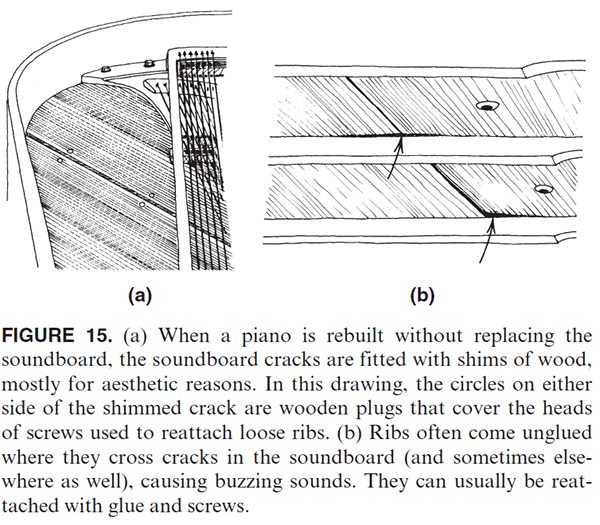
Soundboard and ribs. While you're underneath the grand piano or behind the vertical looking at its structural components, you should also check out the soundboard and ribs. Cracks in the soundboard, while unattractive, are not necessarily important, as long as the tone has not suffered. (This runs contrary to popular thought on the subject, I realize.) Very extensive cracking, however, can be taken as an indication that the piano has suffered great dryness or climatic extremes, and that its life expectancy may be short. (The more expensive the piano, the more important is the consideration of life expectancy.) Usually in such a case, the symptoms of dryness will be evident elsewhere in the piano as well. If the cracks are fitted with wooden shims, this means the piano was rebuilt at some time in the past (Figure 15a). Also check around the perimeter of the soundboard to make sure it isn't coming unglued from the piano.
The ribs run perpendicular to the grain of the soundboard, and therefore perpendicular to any cracks. Check each point where a rib crosses a crack to see if the ribs are still firmly glued to the soundboard or if they have separated (Figure 15b). Rib separations are potential sources of buzzing noises. Again, how important this is to you depends on the severity of the problem, whether buzzing sounds are currently present, and how expensive the piano is. In any case, this is rarely a fatal problem, and often (though not always) ribs can be reattached to the soundboard with glue and screws at reasonable cost without "rebuilding" the piano.
When manufactured, the soundboard has a curvature or crown built into it to help resist the downbearing pressure of the strings on the bridges and to enhance the tone. Over time, principally because of the drying out of the wood, the soundboard loses some or all of its crown. In theory, a soundboard with no crown shouldn't sound good, but actually many fine-sounding pianos have no measurable crown. This is one of those grey areas of piano technology, where every technician has a different opinion on the role that soundboard crown plays in determining the quality of tone.
My sense is that a measurement of soundboard crown can be useful in conjunction with other data. For instance, if the tone in the treble lacks sufficient sustain (p. 42), there is no measurable downbearing of the strings on the bridges (to be measured by the technician), and the soundboard has no crown, then the tonal problem may be due to a worn-out soundboard that needs replacing. But if the soundboard has plenty of crown, we might look elsewhere for the cause of the problem.
To test whether the treble has sufficient sustain, try the Pluck Test. Slowly depress a key in the octave that begins an octave above middle C. This area is the critical "melody range." While holding the key down (to lift its damper), pluck one of the three strings of the note you've chosen. The sound should swell slightly immediately after the pluck and then get softer as the string vibrates. The tone should be clearly audible for at least five seconds. If the sound is less than three seconds in duration, the soundboard may not be functioning properly or the scale may be poorly designed. We pluck the string rather than strike it with a hammer in order to separate out the hammer's effect on the tone from the soundboard's effect.
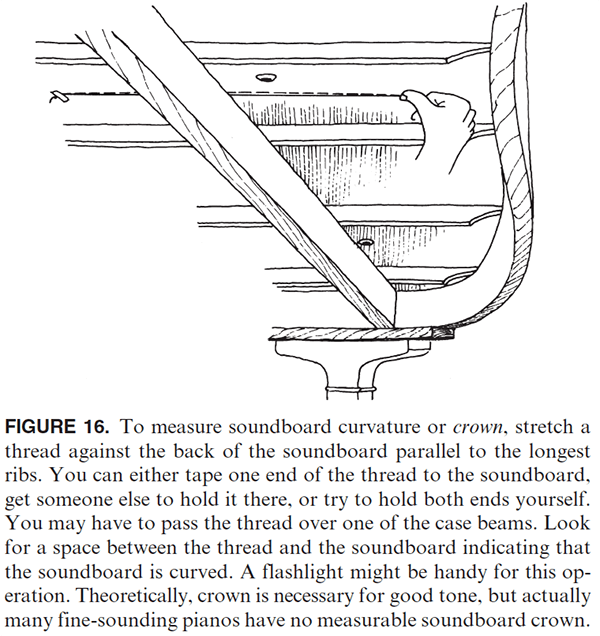
To measure soundboard crown, hold a long piece of thread, pulled taut, against the back of the soundboard parallel to the longest ribs (Figure 16). See if there is a space between the thread and the soundboard created by the soundboard crown. How much space? Any amount is considered sufficient. An eighth of an inch would be excellent.
Again, measuring crown, although much talked about, is of uncertain value. It's probably worth paying attention to when inspecting high-quality grands, but don't bother on verticals.
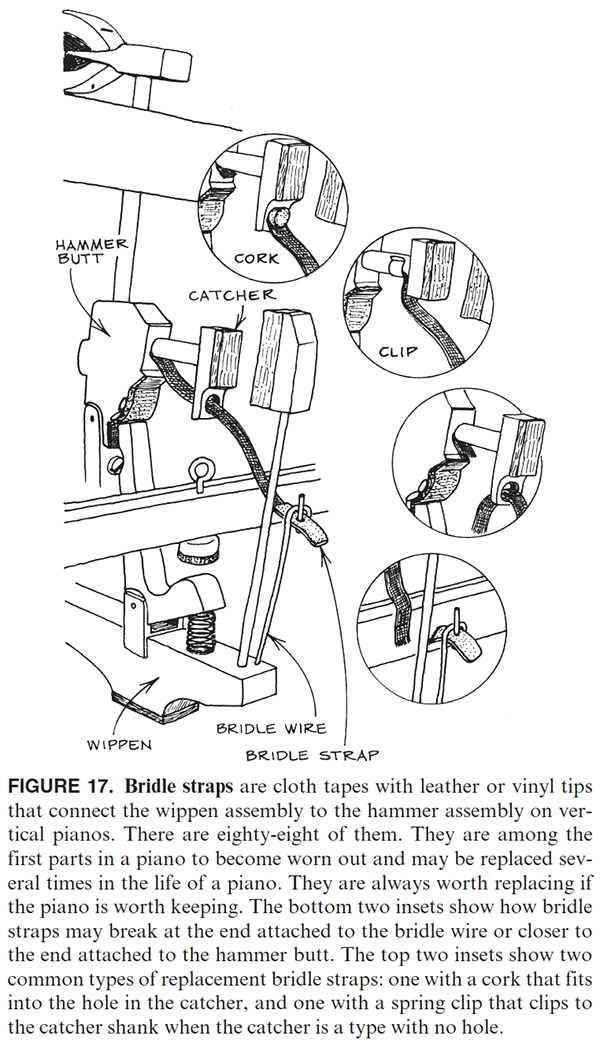
The action. Read about the action in Chapter 1 and also in Chapter 3; there's plenty to know about it. We won't be removing the action. It may be okay to do that (with proper instruction) when inspecting your own or perhaps a friend's piano, but not when examining a piano you are considering buying from a stranger — it's too easy to break parts. (You may legitimately ask to look under the hood of a used car before buying, but unless you're a trained mechanic, the owner may justifiably complain when you start to remove the transmission.) Fortunately, in most cases you can inspect a vertical piano action very thoroughly without removing it. If you're inspecting a grand piano, though, you'll have to be content with what you can see looking down through the strings or in through the front with the fallboard removed. If you're seriously interested in the piano, your technician can do a more complete inspection of the action later.
Do a general inspection of the action. Do the action parts look evenly spaced and uniform in appearance? Does every note work? Do any keys stick or do any dampers not damp properly? Are the hammers, dampers, and other felt parts badly moth-eaten? Check the condition of the bridle straps (vertical pianos only). If they are old and brittle or show signs of deteriorating (Figure 17), they need to be replaced. This is a relatively inexpensive repair that is important and very common.
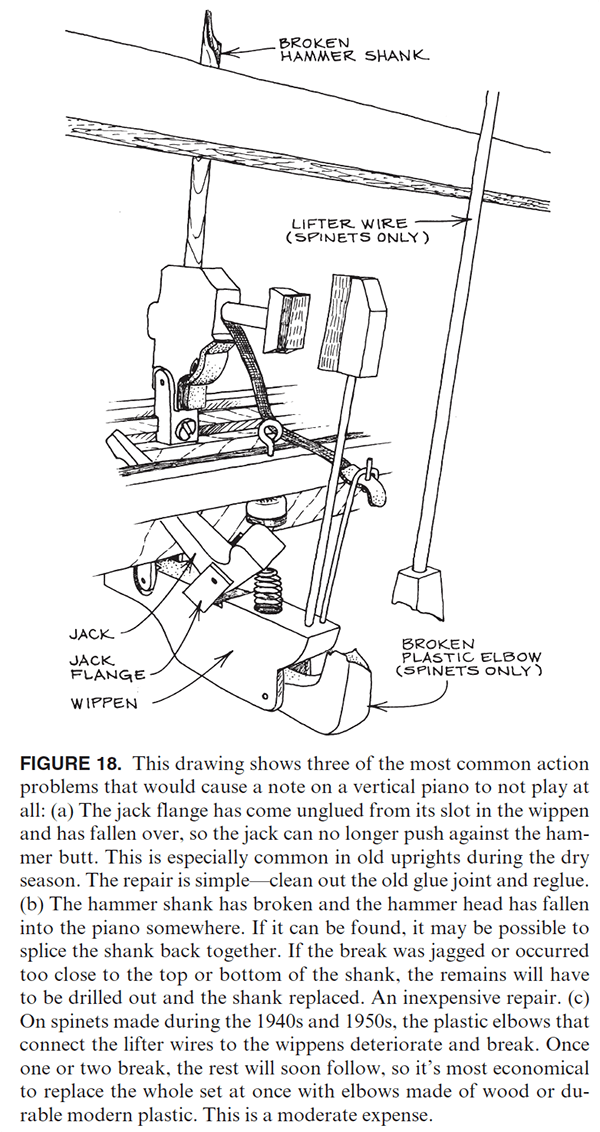
There are thousands of parts in an action and zillions of things that can go wrong. I wish I could go into all of them here, but obviously that's not possible. If you enjoy playing detective, trace down the cause of malfunctions by comparing notes that work properly with ones that don't. The action diagrams and explanations in Chapter 1 should help you. Also make an inventory of any broken parts and strange noises (Figure 18).
Buyers of used pianos are often scared away from instruments with one or more notes that don't play. Actually, broken or missing action parts are usually among the easiest and cheapest repairs to make. Unless the action is utterly worn out or there has been wholesale destruction of parts, problems in this area of the piano are usually much less cause for alarm than some of the other, less obvious problems previously discussed. However, if a lot of wooden parts are broken or loose or appear to have been repaired, and the breakage occurred through normal use, this may indicate that the wood is overly dry and brittle and that future breakage may occur. Such a piano should be avoided by pianists who plan to make heavy demands on the instrument, but it may still be suitable for others, as long as it's humidified during the dry season. (Note: If a vertical piano was made before 1960 and some of the action parts are made of plastic, don't buy the piano. The old plastic breaks easily and the piano is likely to require wholesale replacement of parts.)
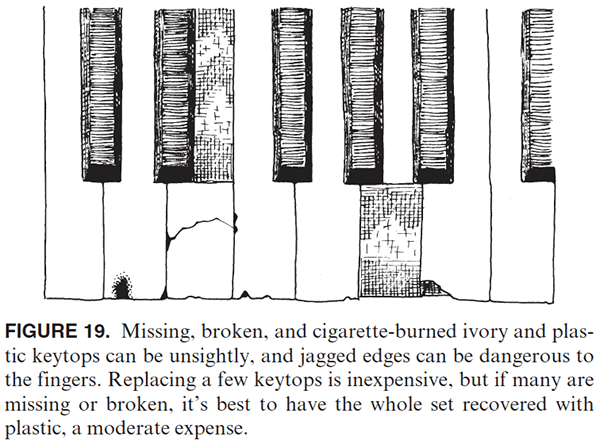
Keys. Look at the keytops. Are they ivory or plastic? Ivory usually has an irregular, natural-looking grain; plastic has no grain or a simulated grain of straight lines. Are any keytops missing or chipped or cigarette-burned (Figure 19)? Don't let a bad-looking keyboard scare you away. A few missing keytops can be replaced inexpensively and a new set of plastic keytops is available at moderate cost.
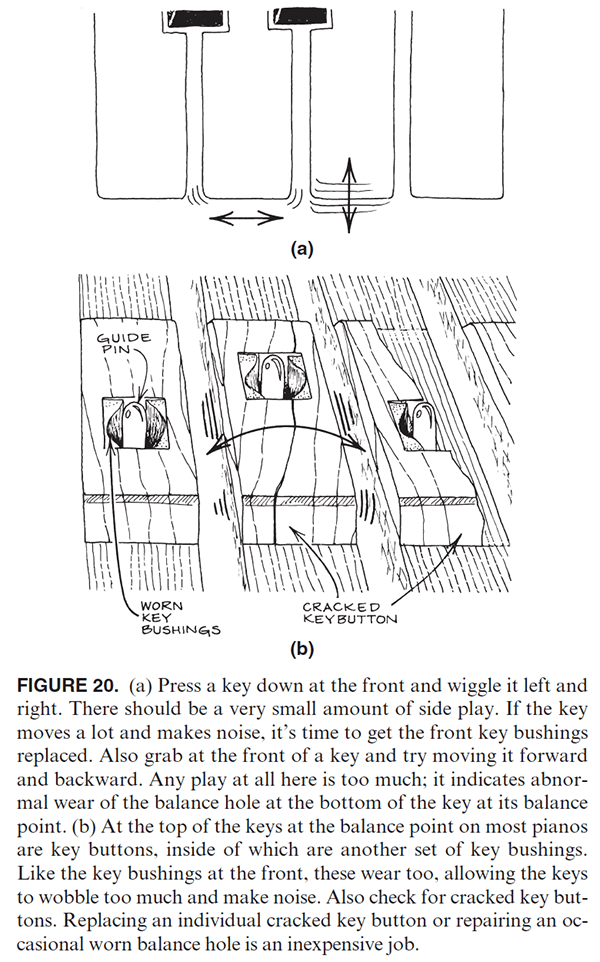
Do the keys rattle? Press a key down at the front and wiggle it left and right (Figure 20). Does it move a lot and make noise? The keys pivot on a key frame with metal guide pins underneath the front and sticking through the balance point of each key. Pieces of cloth called key bushings buffer the key wood from the guide pins. The key bushings in the most-used center area of the keyboard get the most wear. A new set of key bushings is another moderate-cost repair, but one that returns great value in the form of a quieter, smoother-feeling action. Also check the balance point of the key for excessive side-play in those bushings and for cracked key buttons.
Hammers. Of all the parts in the action, the hammers are the most important for you to inspect. In them, too, can be read some of the history of the piano. First look at the string-cut grooves on the striking point of the hammer. Unless the hammer heads have been replaced at some point in the life of the piano, or the hammer felt resurfaced to its original shape by filing off a layer of felt (which would eliminate the grooves), the depth of the grooves will tell you something about how much use the piano has gotten over the years. More importantly, the deeper the grooves or the flatter the striking face of the hammer, the sooner you will need to have the hammers resurfaced, a low to moderate expense. But if there isn't enough felt left for resurfacing, the hammer heads will have to be replaced. This is expensive (at least a few hundred dollars, possibly much more) but worth doing on most grands, but a questionable investment for some of the cheaper verticals. Look especially at the hammers in the mid-treble section. These tend to experience the greatest wear in comparison to the amount of felt on them. Imagine these hammers restored to their original rounded-point shape by filing felt off the shoulders and the striking point. Is there enough felt left on the hammers of the top notes to do this without just about reaching wood (Figure 21)?
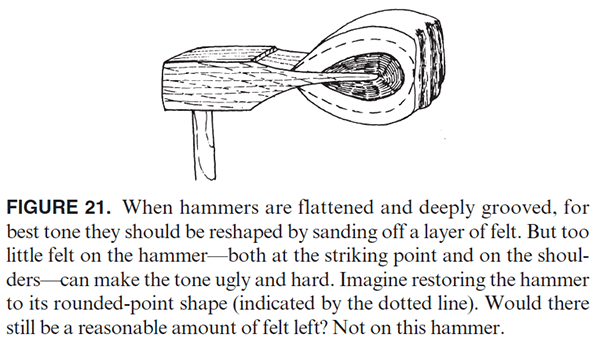
The presence of deep grooves adversely affects the tone of a piano. Of course, on many pianos, particularly cheaper ones that won't be getting serious or fussy artistic use, the presence of grooves on the hammers — even deep ones — isn't of great importance. But it becomes more important in conjunction with certain other hammer problems. Look at the grooves again. Does each of the hammers that are supposed to strike three strings have three well-defined grooves approximately centered on the hammer? Or have some of the hammers moved over a bit, now striking only two of the three strings (Figure 22)? You can also check the alignment of vertical piano hammers by pushing hammers toward the strings with your hand (see Figure 3-32). On a grand, pressing down keys will lift hammers closer to the strings for viewing from above. Moving a hammer over a bit to realign it with the strings is usually a simple matter, but if the hammer has become grooved in the misaligned position, the misaligned grooves will constantly "seek" the strings, attempting to move the hammer back into the wrong position every time you play the note. Eventually this will weaken or break the hammer at its pivot point. This problem can be avoided by resurfacing the hammers to eliminate the grooves, but, as I said, if there isn't enough felt left to resurface, the hammer heads will have to be replaced. Thus, in appraising the condition of the hammers, the presence of deep grooves becomes critical if many hammers are misaligned with the strings.
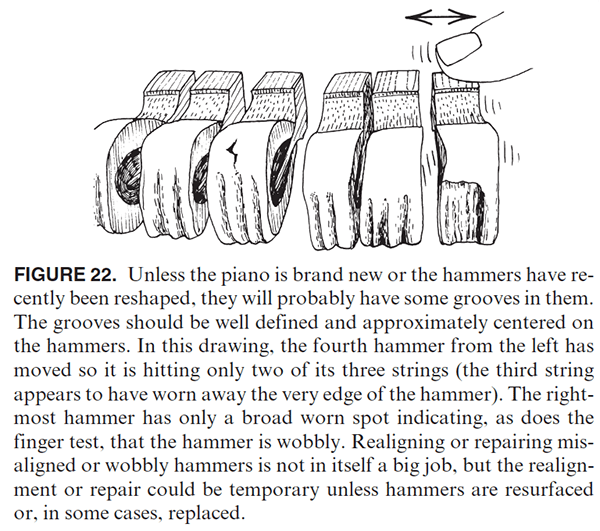
Look at the grooves one last time. Do any of the hammers have poorly defined grooves — just a broad flat spot at the striking point? This indicates that the hammer has been wobbly from side to side, striking the strings at a slightly different point with each stroke. You can also check for wobbly hammers by running your fingers lightly over the tops of the hammers, wiggling them slightly from left to right as you go. Each hammer should be fairly rigid at its pivot point, snapping back quickly to its central position as you let go of it. The wobbly hammers will stand out quite easily. (Caution: Don't try to move a non-wobbly hammer to the left or right more than about 1/16-inch, or you may damage the action center [pivot point].) Wobbly hammers are caused by either loose hammer flange screws (the screws that attach the hammer assemblies to the action rail) or by loose or defective action centers. Tightening loose screws is a simple, inexpensive, and normal maintenance procedure (p. 229). Repinning or repairing action centers is also relatively simple and inexpensive if only a few need to be done, but can turn into a major expense if a large number of hammers are involved. Whether the problem is due to loose screws or defective action centers (or both) will be hard for you to determine by yourself. But regardless of which it turns out to be, the result is usually badly misshapen hammers which, if you're lucky, will need only to be resurfaced, and at worst, will need to be replaced.
The action centers on which the hammers pivot are sometimes too tight. On a vertical, push groups of five or six hammers at a time toward the strings with your hand, release them, and watch for any slow returners. You won't be able to do this on a grand until the action is removed, but you can watch the hammers through the strings as you play several keys at a time. A few sluggish action parts are usually not a major problem. If many hammers, or even a whole set of hammers, are sluggish, repair can be moderately expensive, but sometimes not out of the question, even for an old upright. The advisability of doing this will depend on the cause and severity of the problem and whether wholesale replacement of parts is necessary or if simpler remedies will suffice.
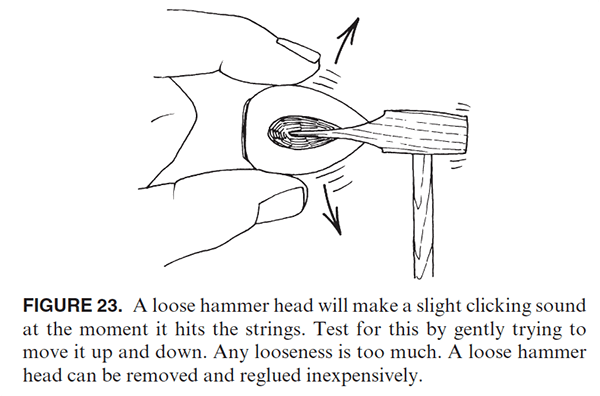
One last hammer problem and we'll move on to something else. Hammer heads sometimes become loose on their shanks due to drying and cracking of the glue joint, and will make a slight clicking sound at the moment the hammer hits the string. Test for this by wiggling the hammer heads up and down (in relation to the shank). If they wiggle at all, they're loose (Figure 23).Regluing loose hammer heads is about the same size job as repairing loose or tight action centers.
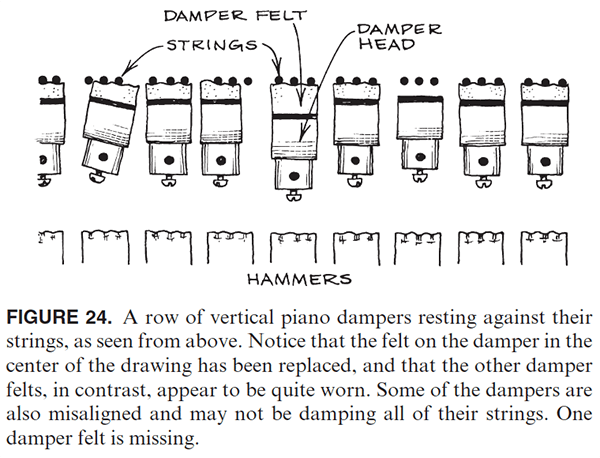
Dampers. Dampers are the felt pads and wedges that rest against the strings to keep them from vibrating when they're not supposed to (Figure 24). Are they doing their job? Play each note and release it, making sure that it stops ringing promptly. (Note: The strings in the top couple of octaves don't have dampers and are supposed to keep ringing.) Do many of the dampers buzz when they come back down on the strings? It may be time for a new set of damper felts if they do, usually a moderate-cost repair. Press the right-hand pedal slowly and see if all the dampers rise off the strings at precisely the same moment. If not, they may need regulating. Damper problems are sometimes difficult to solve, but not usually so expensive or severe that they should prevent you from buying a piano that has them.
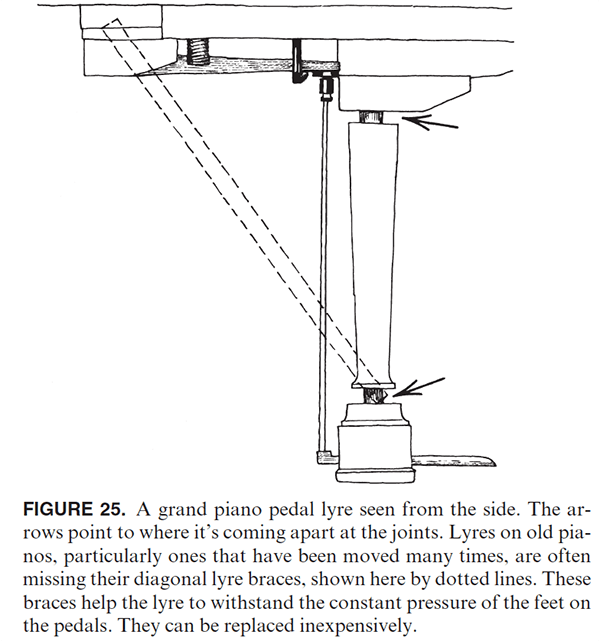
Pedals. Do all the pedals work? If not, investigate to see why not (see Figure 3-33 for a description of how the pedals and trapwork operate). In a vertical, often a dowel will be missing or out of place or the pedal will need minor adjustment. The vertical piano's pedal system is very simple, and usually inexpensive to fix or adjust. The grand's pedal system is a lot more complicated, and since some of it is located behind the action, you may need a technician to inspect it. One thing you can check on a grand is whether the pedal lyre is coming apart at the joints, or falling off the piano (Figure 25). Both conditions can be fixed at moderate expense. Loose and noisy pedals are usually relatively minor problems on both grands and verticals. However, on verticals, do check to make sure that the board to which the pedals are attached isn't cracking, bending, or falling off the bottom of the piano (this, too, can be fixed at low to moderate expense).
Is there a middle pedal? What does it do? If you are buying a grand and are a serious player of classical music, you may desire a true sostenuto pedal. You probably won't need it often, but when you do, there is no substitute for it. Some cheaper grands have a middle pedal that just lifts the bass dampers — a fairly useless feature. This feature is standard for many verticals. Some verticals don't have a middle pedal, or have one that never worked or no longer works — no great loss!
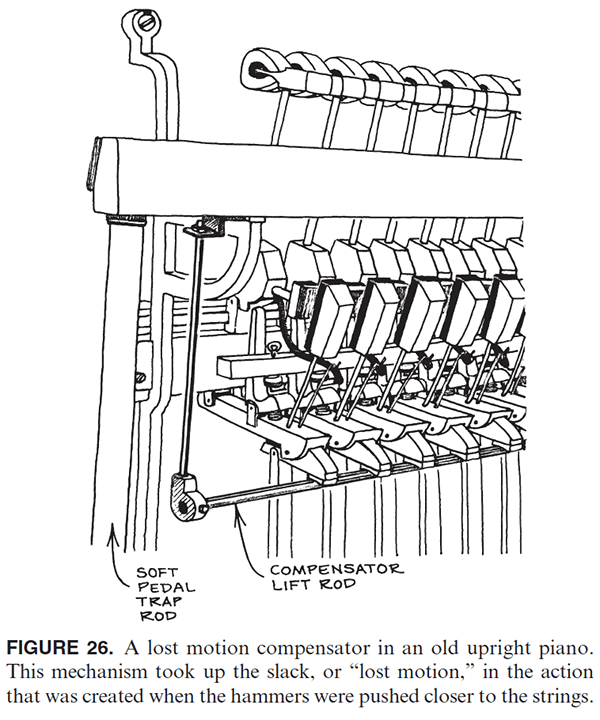
As discussed, the left pedal of a vertical piano makes the sound quieter by pushing the hammers closer to the strings, but in doing so it puts the action out of adjustment. Some old uprights were outfitted with a "lost motion compensator" mechanism (Figure 26) that allowed the action to remain in proper adjustment when this pedal was used. Vertical pianos with a lost motion compensator or a true sostenuto mechanism, or both, were usually among the best old uprights made and are often still in good condition.
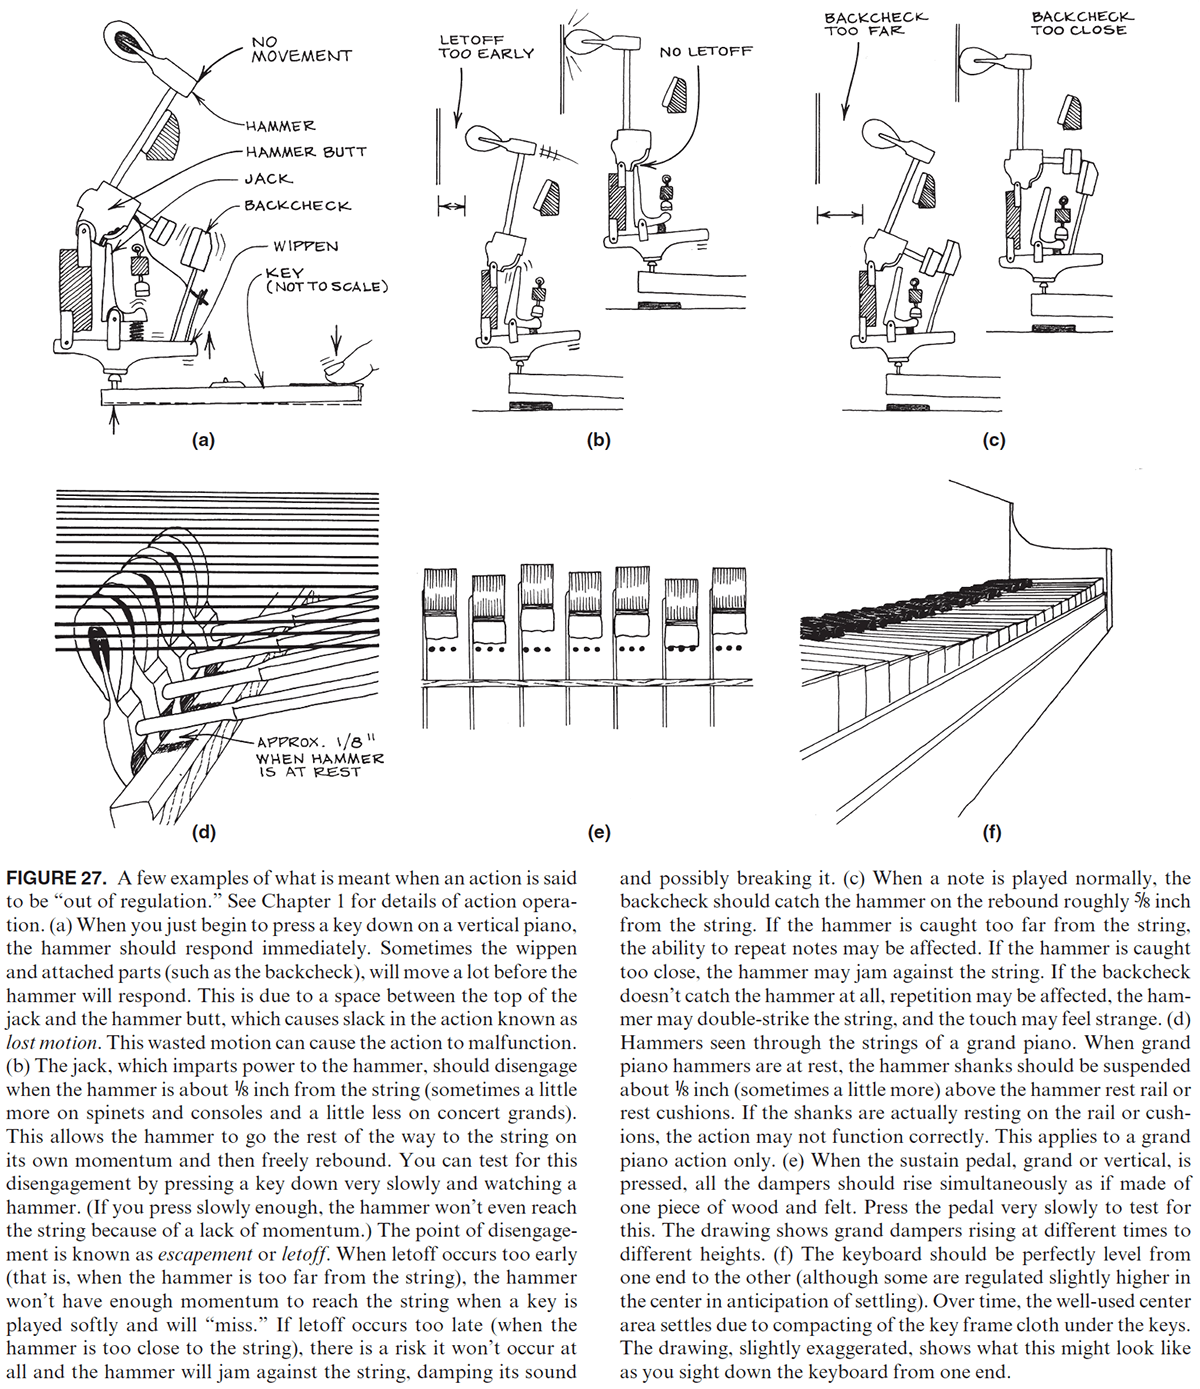
Regulation. Regulating is the process of making technical adjustments to the piano action to compensate for the effects of wear and atmospheric changes on the wood and cloth parts that have occurred over the months and years of use, and to restore the functioning of the action as close as possible to the original factory specifications. The cost can vary from very cheap for minor amounts of regulating to moderate (three to four hundred dollars) for a complete vertical piano regulation to expensive (four to seven hundred dollars) for a complete grand action regulation. A full technical discussion of regulating would be too lengthy to be included here, but to give you an idea of what regulating involves, a few examples are included in Figure 27.
In addition, here are two tests you can do now: First, check repetition on several keys by playing a key rapidly with alternating hands while depressing the right pedal. (Depressing the pedal removes the assistance of the dampers in returning the keys to rest and thus reveals any excessive friction in the action.) Second, play a number of keys as softly as possible. If the action fails to play reliably (i.e., skips or misses) at reasonably soft dynamic levels, the action probably needs regulating.
Your technician can more fully evaluate the piano's regulation needs later. How much importance you should place on proper action regulation depends on how fine an instrument you're buying and on your level of technical skill. However, playing on a piano that is grossly out of regulation can be very frustrating, and possibly harmful to the piano.
Serial number. Find the serial number of the piano so you can look up its year of manufacture in the Pierce Piano Atlas (p. 178). Usually four to eight digits, the serial number is most often located near the tuning pins, either printed directly on the plate or engraved in the wooden pinblock and showing through a cut-away portion of the plate. Or the number may be printed somewhere else on the plate or soundboard, printed or engraved on the top or back of a vertical piano back, or printed or engraved on the front edge of a grand piano key frame. (Sometimes a three- or four-digit number used in the manufacturing process also appears on various case parts; don't confuse this with the serial number.) When no serial number can be found or if the year of manufacture isn't listed in Pierce, sometimes a technician can estimate the age within about ten years just by looking at the case styling or technical details.
Close the piano now, reversing the instructions in Figures 1 through 9. Play the piano again and listen to the tone. Is there a smooth transition in tone from one end of the keyboard to the other, or are some sections completely different in character from the others? Do the bass strings sound full and alive, or dead and muffled? Do the few lowest and highest notes have a definite pitch and pleasing sound, or are they indistinct and essentially useless? Are you pleased with the tonal quality, brightness, and volume? Remember that: (1) room acoustics have a significant effect on tonal quality; (2) if the piano is out of tune, you may not be able to make an informed judgment about the tone; and(3) to some extent, tone can be altered by a technician through a process known as voicing or tone regulating. Read about all this in Chapter 3 and in Chapter 7.
This concludes the portion of the inspection that you can do yourself. If you later have a technician look at the piano, he or she will go over much the same ground you did, in addition checking the tightness of the tuning pins with a tuning hammer or a torque wrench, removing and inspecting the action of a grand piano, evaluating the state of the action regulation, and possibly measuring the downbearing of the strings against the bridge to check for possible soundboard and tone problems. Some technicians prefer to check out a piano alone, later issuing a written or oral report, whereas others wouldn't mind your presence and might be happy to answer your questions as they work.
Used-Piano Checklist
Here is a checklist you can copy and take with you when checking out a used piano. The list is a brief summary of the section "Checking Out the Piano." I assume you have read the section and know how to remove the outer case parts of a piano to look inside. If you decide to proceed further with a piano after examining it with this list, you will need to hire the services of a professional piano technician to check some things you could not, such as the tightness (torque) of the tuning pins, and to render an experienced judgment about the piano as a whole.
Looks, styling and finish
- Can you live with it?
- Does it need refinishing?
- Has it been restyled in an unusual way?
- Does it have any missing or broken cabinet parts or hardware (music desk, hinges, etc.)?
- Check for loose veneer and other signs of water damage.
- Does a matching bench in good condition come with the piano?
Pinblock and tuning
- Is the piano up to standard pitch? Is it in reasonable tune?
- Badly out-of-tune unisons may be a sign of loose tuning pins, especially if the piano has been tuned recently or if the mistuning of the unisons is gross. The tuning pins should be checked by a technician.
- Are tuning pins uniform in appearance, or are there some obvious replacements? The latter could indicate the pinblock is going bad.
- Look for at least ⅛" clearance between tuning pins coils and the pinblock or plate.
- Look for ugly, dark brown, gummy stains which indicate the pinblock has been doped with chemicals to temporarily tighten tuning pins.
- On a grand, if you are able to remove the fallboard, look at the underside of the pinblock for signs of cracking and delaminating.
Strings
- How rusty? Light rust or tarnish is okay, but excessive rust, especially on coils or at bearing points, is a problem, and could lead to breakage.
- Are any strings missing?
- Too many new-looking strings among the older ones indicates a breakage problem; too many splices, as well.
- Do bass notes sound clear and resonant, or short and tubby?
Bridges
- Primary problem area is the bass bridge.
- Some hairline cracks around bridge pins are customary.
- Excessive cracks that cause dislocation of bridge pins, especially on bass bridge, are a big problem and indicate the need for a new bridge or bridge cap.
- A piano with a loose bass bridge will have much weaker tone on one end of the bass section than the other.
- Also check the treble bridge for serious cracking.
- If piano is very old, check wooden upper bearing point for cracks.
Structural integrity
- Look for cracks in the plate, both in the struts and in the tuning pin area. Repairing a cracked plate is costly and usually not guaranteed. Cracked plates are very rare.
- Look for separations or delaminations in the bottom edge of the rim of a grand piano, or for a large crack in the back of the top horizontal beam of a vertical piano.
- Check legs for cracks or for an undue amount of rocking of the piano.
- Check vertical piano for missing casters.
- Before lifting the lid, check it for cracks and missing hinges.
Soundboard and ribs
- Play all the keys from one end to the other, listening for evenness of tone across the keyboard. Note any buzzing or rattling sounds.
- Look for excessive soundboard cracking. More than a few unrepaired cracks in the soundboard may be cause for concern.
- Wooden shims in cracks indicate that the piano was rebuilt at some point in the past. Make sure there are no new cracks alongside the shims.
- Check to ensure soundboard is glued around the perimeter.
- Where ribs cross cracks, check to ensure they are still firmly glued.
- Soundboard crown: any measurable crown is good. Some good-sounding pianos have no measurable crown.
- Pluck Test: Slowly depress a key in the octave that begins an octave above middle C. This area is the critical "melody range." While holding the key down (to lift its damper), pluck one of the three strings of the note you've chosen. The sound should swell slightly immediately after the pluck and then get softer as the string vibrates. The tone should be clearly audible for at least five seconds. If the sound is less than three seconds in duration, the soundboard may not be functioning properly or the scale may be poorly designed.
Action, Keys, Hammers, Dampers & Regulation
- Verify that all keys play. If not, try to determine why. Are some parts missing, broken, or unglued?
- Check visually inside, looking for consistent spacing and alignment of action parts.
- If made before 1960 and some action parts are plastic, do not buy the piano unless the plastic parts are post-1960 replacement parts (ask your technician).
- Visually check condition of hammers, dampers, and other felt parts for moth damage.
- Check that all bridle straps (verticals only) are in place and look okay.
- Note any sticking or sluggish keys.
- Check visually for even spacing and squaring of keys.
- Are keytops ivory or plastic? Are any keytops missing, chipped, or damaged?
- Check keys for minimal wiggle, rattle, or excessive left-right movement. Are new key bushings needed?
- Check hammers for depth of grooves, amount of remaining felt, correct number of string dents, possible wobbly hammers (string dents are misplaced or unclear), loose hammer heads (clicking noise or up/down movement of hammer head).
- Play all notes staccato, except those with no dampers (upper 15-20 notes). Do all notes cut off cleanly? If some buzz or continue ringing, dampers may need regulating or replacing.
- Make sure dampers move together when right pedal is depressed.
- Check condition of action regulation, using visual examples on page 199.
- Check repetition on several keys by playing a key rapidly with alternating hands while depressing the right pedal.
- Play a number of keys as softly as possible. If the action fails to play reliably (i.e., skips or misses) at reasonably soft dynamic levels, the action probably needs regulating.
Pedals
- Right pedal: see dampers, above.
- Middle pedal: If the middle pedal activates a true sostenuto mechanism on a vertical piano, the piano is probably a higher-quality instrument. If the middle pedal does notactivate a sostenuto mechanism on a grand piano, the piano may be a lower-quality instrument. To test the sostenuto: Depress right pedal to lift dampers, then depress middle pedal and keep depressed while releasing right pedal. Dampers should remain raised.
- Left pedal: moves hammers closer to strings to quiet the piano (verticals), or shifts keyboard (grands). If left pedal on grand just operates bass dampers, it is often a sign of a lower-quality instrument.
- Lost motion compensator (verticals): keeps action in adjustment when soft pedal is used. Usually indicates a better-quality older piano.
- Is grand pedal lyre coming apart at the glue joints? Are lyre braces in place and lyre feels secure when pedals are used?
Other
- Find serial number of piano for later determination of age.
- Ask owner about piano's history (but don't take it all as the gospel truth).